Blogcritics The critical lens on today's culture & entertainment
It has been said that photography was invented to help the painters of the day, so that they could capture images for reference before creating their works of art. In fact a number of famous painters were also well known for their photographic work. Edgar Degas, the late 1800s impressionist famous for his paintings of dancers, was also a very accomplished photographer. He created photographic composites that he would transform into paintings. With the availability of programs such as Snap Art, this cycle has come full circle: Technology is now allowing photographers to become painters.

Snap Art 4 is the latest release from Alien Skin Software of their plugin and standalone software that allows you to take your digital images and create painterly works of art. It offers many styles and media: oil, pencil, watercolor, crayon, and much more. Its goal is to allow you to take your creative idea and turn it into reality even if you do not have the technical training to do it by hand.
Snap Art 4 is really easy to use. You open your image in Adobe Photoshop CS6 or later, Adobe Lightroom 4 or later, Adobe Photoshop Elements 12 or later, or Apple Aperture 3 or later. You can also open Snap Art 4 as a standalone product for when you want to process a batch of images.
When working to convert images to paintings, I tend to like to enhance the coloring and saturation of the image so that when it is converted, there is a lot more pop to it, but that is a personal preference and after all this is art and can be very subjective.
I am working with Photoshop CC. Once I have my image ready I select the layer I want to work with and the filter from the filter menu. My image is then loaded into the Snap Art 4 interface. One of the new things in version 4 is that the interface has been updated to let you work with fewer distractions.

The first thing to notice is that there is a darker theme to allow you to focus better on your image. This look is similar to other editing tools on the market. Next, you’ll see collapsible panels that work much in the same way as in Adobe Lightroom, where when you need them they are there, but when you want to focus on your image, they can be made to disappear.
The layout, as with most applications of this type, has your image in the center of the screen. On the left side your presets are arranged in alphabetical order of genre. You have Color Pencil, Comics, Crayon, Impasto, Oil Paint, Pastel, Pen & Ink, Pencil Sketch, Pointillism, Stylize, and Watercolor. If you are unsure about what each of these can do, there is an Effects Tour that will render thumbnails of each of these styles in the preset panel so that you can get an idea of what each looks like. Within each style are several sub-styles. For example, under Oil Paint you have Abstract, Colorful, Detailed, Dry Brush, Thick Paint, and Vignette.
On the right are several panels. This is where Snap Art 4 gets interesting. At the top, the Navigator panel lets you resize your image, and if the image becomes larger than the viewing window, you can navigate to the area of the image you want to work with.
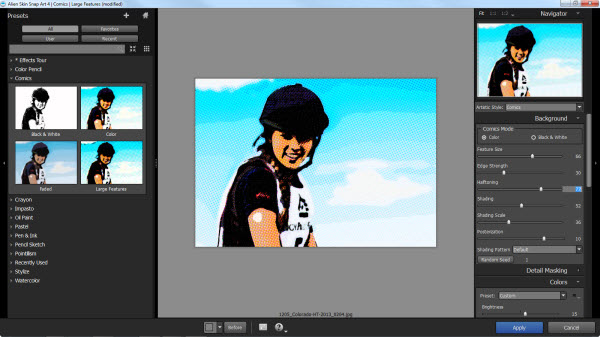
Below that is the Artistic Style panel. Here a dropdown mimics the Effects Tour presets but without the preview. Next you have the Background panel where you can control the brush size, how photo-real the image will remain, the paint thickness, stroke length, color variation, and brush style.
After that you have the masking area, where you can mask off areas where you don’t want the painterly effect to be as pronounced, such as where you want to bring back more detail so as to help direct the viewer’s eye or where you want to have more detail recognition such as on a person’s face.
There are two parts here: the mask effect (or the location that you want the mask to be applied), and the mask tool itself. The mask effect has the same controls found in the background panel and gives you the same control to counteract the background effects. The mask tool area controls the size of the tool, the amount of feathering the tool will provide between the masked and non-masked area, and how much opacity will be applied.

There is a lighting panel where you can choose several presets or manipulate it all by hand. You can control the highlight brightness, size, direction, angle, and color. You also can create a vignette around your image where you can control the amount, size, softness, distortion, and color. There are also several vignette presets.
The canvas panel lets you control the look and feel of the canvas that paint will be applied to. There are several presets to choose from, and then you can make modifications like controlling the thickness and zoom of the texture, and the texture itself. The colors panel lets you control the brightness, contrast, saturation and temperature of the colors in your painting.

If you open up Snap Art 4 as a standalone application you can work with a number of images at the same time. At the bottom of the screen is a batch panel that will house all of the images. When you apply a preset or make a customization, it will be applied to all of the images in the batch. You can select a single image as well.
You can apply a preset to all the images and then go in and make changes to individual images. When you are ready to save them, you get the option of which ones to save, where you want to save them, a suffix name to be added, and how high a quality to save them in, as if they are JPEG files.

The bottom line is that Snap Art 4 is one of the easiest such tools to use, and yet very versatile in its abilities. It provides a lot of powerful functions while being very responsive. The new thumbnails provide a lot of instant feedback about what your image will look like and the parameter modification abilities provide a wide range of possibilities for your creation. In fact, if you are using a program like Adobe Photoshop with its layers and built-in painting tools, there really is no limit to what you can do with Snap Art 4 and no restriction on your technical skills.
While Alien Skin does have a rather helpful keyboard shortcut list online, my only complaint is that there is not more information on the parameter adjustments; there is no manual, only videos. While videos are great for seeing how things work, there should be some sort of reference sheet on all of the details and how they affect the changes. Aside from that, I really like the interface changes, the previews, all of the layout changes, and especially the scrolling, collapsible panels for the parameter adjustments, and the speed. If you want to take your photographic creativity to a whole new level, then I very highly recommend Snap Art 4.