 Blogcritics The critical lens on today's culture & entertainment
Perfect Photo Suite 8 is the latest release from onOne Software. While it still works with Adobe Photoshop, Adobe Photoshop Elements, Adobe Lightroom, and Apple Aperture, now, for the first time, it is also a complete standalone photo editor. It contains everything you need to handle even fairly complex photographic post-processing tasks.

There are now eight areas in Perfect Photo Suite. There is a new Browse that gives you the ability to locate the files you want to work on, a new Perfect Enhance that provides you with the capability to enhance your images, a re-engineered Perfect Effects for stylizing your images, and Perfect B&W for converting your images to black and white. Perfect Portrait is for all of your portrait retouching. Perfect Layers is for combining and blending images without Photoshop. Perfect Mask is for creating high-quality masks. And Perfect Resize is for increasing or changing your image size without loss or detail.
Perfect Photo Suite also comes in three editions. The Standard Edition is a complete standalone photo editing solution. There is a version for Adobe Lightroom, Adobe Photoshop Elements, and Apple Aperture, which also runs as a standalone application. And there is the Premium Edition which adds the ability to run with Adobe Photoshop and some other features. For more information about pricing and the differences among these editions, check out the comparison page at onOne’s website.
While, as in past editions, Perfect Photo Suite 8 works as a plugin for other photo editors, I will focus my review on using it as a standalone application. More importantly, how well does this suite work if you don’t have Photoshop, Lightroom, or Aperture?

Browser Module
The first thing to notice is that there is a new Browse module. In the past this was never necessary because Perfect Photo Suite worked from within a host application. You would have already selected the file that you were to work with prior to running the plugin so there would be no necessity to locate files.
The Browser is built much the same as in a host application, although there are neither cataloging nor tagging or flagging abilities. You have a main preview window on the right taking up the greatest portion of screen real estate. On the left you have an Info pane with information on your image, a Sources pane with a list of common locations, a Folders pane with a tree view of the current source, and a Recent pane that keeps track of your recently opened files and folders.
On the bottom of the browse window is a slider that adjusts the thumbnail size in the preview window. At the top of the browser is the module selector where you can choose which module you want to use next on your image. When you are ready to work you just use the Sources, Folders, or Recent pane to select the image you want to work with.

Perfect Enhance
Chances are the first thing you will want to do is to go into the Perfect Enhance module, new to the Perfect Photo Suite. It provides essential tools for basic enhancements. You can use it to fine-tune your brightness, contrast, white balance, vibrance, detail, and vignette. There are also Retouching Brushes for content-aware fill, healing, and cloning.
On the left side of the screen is a list of presets for doing quick corrections. The center contains the main view as well a Tool Well that contains several tools for cropping, an erase tool for removing unwanted objects, a hand tool for positioning the image, a zoom tool for magnifying the image, a retouch brush, and a red-eye tool to remove red-eye.
On the right side of the screen you have a Preview panel where you can navigate, Loupe, view a histogram, or view the image info. Below that is the Quick Fixes panel where you can do some automatic adjustments to brightness, contrast, vibrance, detail, temperature, and vignetting. Finally below that are a Color and Tone Adjustment panel, a Vignette Panel, and a Sharpening panel where you can make additional or more advanced adjustments to your image.

Perfect Effects
If you want to bring more “wow” to your image, you would come into the Perfect Effects module next. Here are more than 20 adjustable filters to enhance and stylize your photos in a wide variety of ways.
You can enhance the tonal effect using Dynamic Contrast. What was once called FocalPoint is now included in Perfect Effects. It will allow you to create depth of field, tilt-shift, and selective focus on your images.
There are filters that will let you create a High Dynamic Range (HDR) look to a single image. You can use Vintage effects to create an old-time look. There are color enhancement filters to manipulate the vibrancy of colors, cross processing filters to simulate the darkroom technique of mixing chemicals, and photo filters to emulate solid colors, gradients, and bi-color filters.
Much as in the other modules, on the left side you have presets you can start off with. On the right side you have a filter stack. This is really nice in that you have the ability to add filters upon filters that give you endless possible combinations. Below the filter stack is the filter options panel. Here you can change each preset exactly to your own liking.
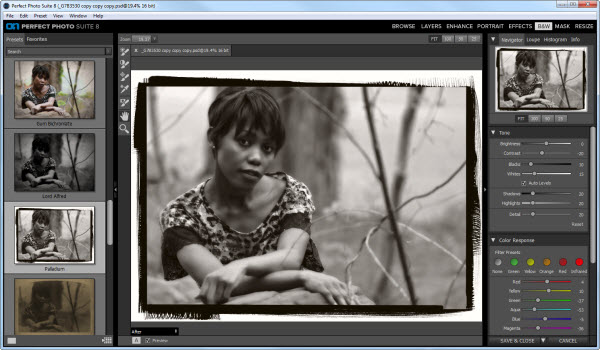
Perfect B&W
Perhaps you want to convert your image to black and white. The Perfect B&W module gives you a lot of flexibility when it comes to black and white post-processing. You can reproduce vintage styles with grain and implement other traditional film techniques such as dodging and burning.
On the left side you are presented with various panel drop-downs that include basic conversion techniques as well as presets that focus on 19th century and 20th century styles. On the right side you have the control panels where you can work with the tones of your image as well as the color response.
With the tones you can control the brightness and contrast. You can work with shadows, highlights and details. The color response will let you enhance your image much as you would if you were working with photographic color filters to change the color range within your photo. There is also a Zones view where you can simulate the use of the Zone System through all 11 zones and it updates in real-time as you make your changes.

Perfect Portrait
For quick and easy portrait enhancing, Perfect Portrait provides you tools so that you can smooth skin, remove blemishes, enhance eyes, whiten teeth, clear up red-eye, fix skin tone coloration, and make each face in your image just the way you would like it to look.
When you launch Perfect Portrait it will attempt to recognize the faces in your image. There will be a square placed around each one and there are options in the Face menu to add, delete, or reset the faces. When you click inside the box you can refine how the eye and mouth controls recognize each one of these features. Once this is set you can begin to work with the presets and options.
On the left are the presets, broken down into children, female, male, and groups. These give you control over differing styles such as for elderly, full body, natural, skin only, etc. They provide a good starting point for your retouching.
On the right you have modifications panes. Here you can fine-tune your skin retouching by altering what is done to blemishes, shadows, texture, shine, and more. The Color Correction pane provides control over the amount of correction, warmth, color shift, and ethnicity. It does this based on skin tone instead of white point. The Eyes and Mouth pane takes care of whiting eyes and teeth, removing red-eye, and adjusting the color of the irises and the vibrancy of the lips.

Perfect Layers
Perfect Layers lets you work with layers in Adobe Lightroom, Apple Aperture, and the standalone version of the Perfect Suite. This gives you the ability to create composites, remove unwanted objects, and create images with elements like backgrounds, borders, and more.
On the left side of the window you have a browser pane that lets you locate the images you want to use. There is also an Extras tab that contains backgrounds, borders, and textures that you can use with your images. Also on the left side of the main image pane is a Tool Well that provides several tools such as transform, crop, move, and trim.
On the right side of the screen is the Layers pane. Here is where you can build up your various layers and work with them. You can combine the layers using Blending Modes and control the amount of effect that the layer and blending has through an opacity slider.
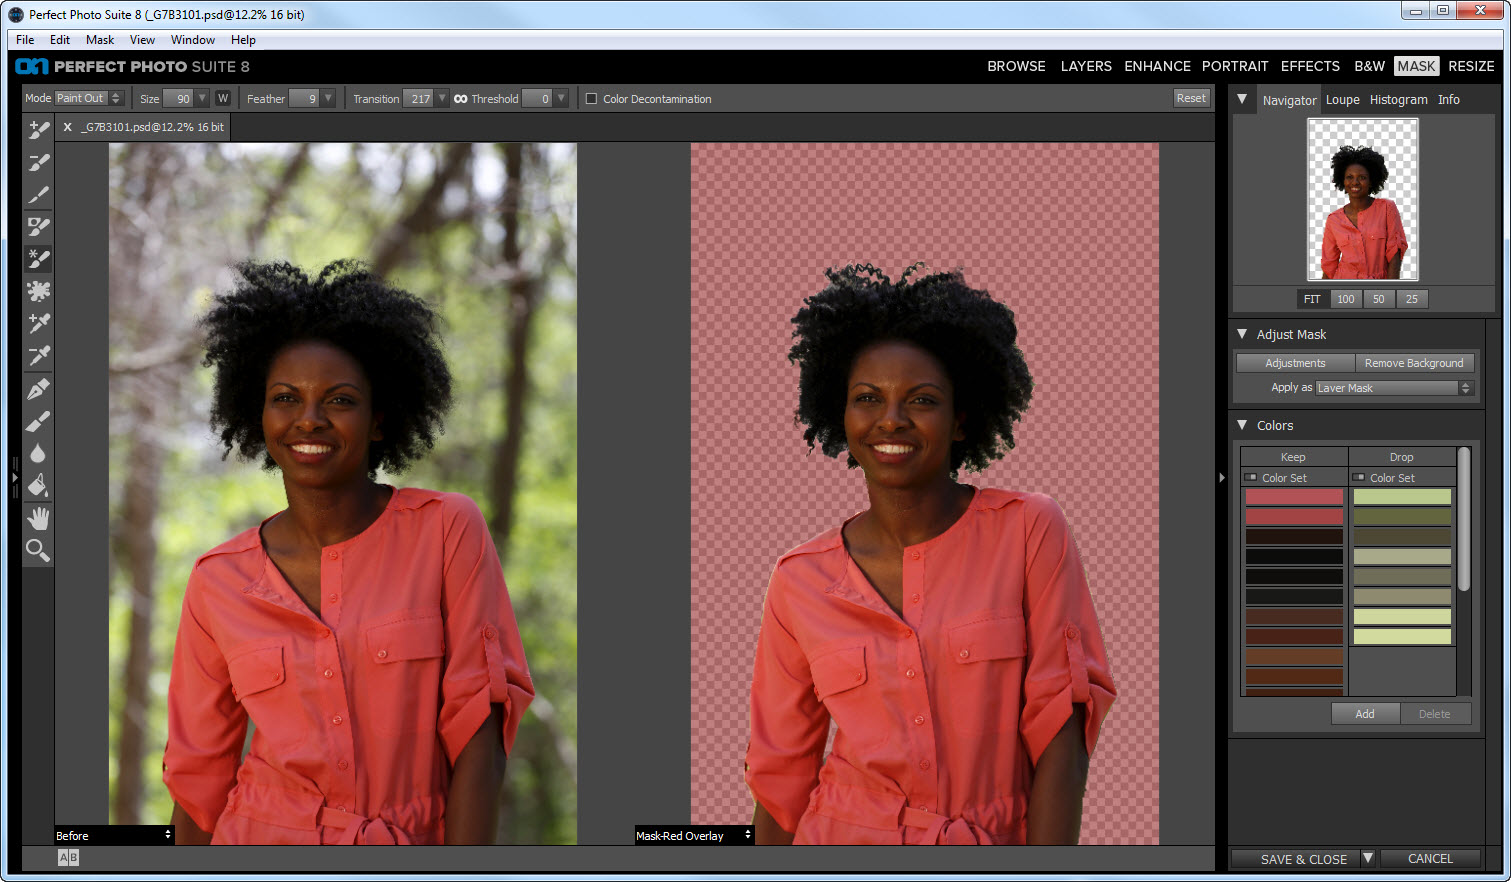
Perfect Mask
Perfect Mask lets you cut things out of a photo quickly and easily. It automates much of the tedium of trying to extract an object out of an image so that it can be used elsewhere, or inserting an object into the photo such as a more dynamic sky.
Perfect Mask has Automatic Background Removal technology that provides an initial masking that makes a best estimate. You can then fine-tune it using the Keep, Drop, and Refine tools to make it more accurate.
On the left side are all the tools at your disposal. Say you wanted to replace the sky in a landscape image. You drop the images into the Layers module with the sky you want underneath the one you want to get rid of. You then take your Drop Brush and paint out the sky on the top image. If you paint over something you shouldn’t have, you use the Brush Tool to paint it back in. If you have fringing or halos along hard edges, you can use the Chisel tool to create a sharper edge. It makes it all very easy to work with.

Perfect Resize
Now that you have your image perfected, you can use Perfect Resize to get your image ready for print. Perfect Resize is based on Genuine Fractals technology and has been used for creating resized images up to and even over 1000% for years in the photographic and printing industries. But Perfect Resize does even more than that.
Along with allowing you to increase the size of your image, Perfect Resize will help maintain sharpness and detail. You can crop and resize images to any print size quickly and easily. It can also help you prepare images for videos, websites, blogs, and email, and is good for creating larger pictures from ones you take on your mobile phone.
On the left side you have presets with various paper types and sizes. There are also presets for iOS devices, photo lab sizes, and video, web, and email sizes. On the right you have a pane for the pixel dimensions of your image. Below that is the document size. Here you can use one of the presets or custom-size your image using height, width, and resolution. There are also panes that let you control sharpening, film grain, and tiling. If you want to create a gallery wrap, there is a pane for setting your image up for that as well.

Perfect Batch
Perfect Batch is a mechanism that will let you automate your process for working with a group of images. It can be launched from either the Browse or Layers modules and lets you convert a batch of files from one format to another, resize a group of files, apply presets from any one of the Perfect modules, or add a watermark to a group of your images all at once.
As I said in my intro, I wanted to see how Perfect Photo Suite 8 would function as a standalone application. I think that this is important in light of the changeover of Adobe Photoshop into a subscription-based package and all of the controversy that that caused.
I think that Perfect Photo Suite 8 is a very solid photo editing package that can stand on its own in the photographic community. I think that has all the pieces for photographers to get their editing accomplished and produce high-quality work.
All the modules worked correctly and were very easy to use. The Browser made it easy to find anything I needed, but since I am used to Lightroom, I would miss the cataloging, tagging and rating capabilities. That may not be an issue with your own personal workflow, and this being essentially version one, I can see the Browser as an area that will improve over time.
Perfect Portrait worked really well, with the exception that on occasion its ability to cleanly locate a face would be off. This was not a major problem as you can always reset and add the area where the face is. Perfect Mask on the other hand worked really well in masking, even in some of the more challenging situations. Sometimes you will have to work at it to get it perfect, but without it you would not be able to get it at all.
Perfect Layers is a necessity for those who don’t have Photoshop or Photoshop Elements if you want to do any kind of layering. Perfect Enhance, Perfect B&W, and Perfect Effects really allow you to add that bit of extra to bring out your images. If you print or send your images out to a lab for printing, Perfect Resize makes that process a breeze. And while I don’t batch image, if you do, I can see that being really handy.
Perfect Photo Suite 8 will not replace Adobe Photoshop for those who need advanced editing and manipulation capabilities and I don’t think that it can replace Adobe Lightroom for those who need cataloging, tagging and the other things that Lightroom provides. But I think it definitely has its place as a standalone editor.
What I see as really great about Perfect Photo Suite 8 is that it also enhances all of the other photo editing products and makes them better. So any way you look at Perfect Photo Suite 8, it is a win-win. For this reason, I very highly recommend Perfect Photo Suite 8.


I have version 7.5 and it is amazing for the price of $79.
Do you use the this software as a standalone or as a plug in with Adobe Elements/Lightroom/Photoshop? Thanks.
I used to use OnOne Photo Tools 2.6 but now it no longer works with my operating system. Called OnOne today and all those wonderful effects that made my work pop and unique are gone. They couldn’t duplicate them in this system. That sucks! Was Supposed to get an e-mail with a preset package that could have had some things that worked similarly, but never received it.