Blogcritics The critical lens on today's culture & entertainment
Cinema 4D Release 18 is the latest version of the high-end 3D motion graphics, visual effects, painting, and rendering software application from Maxon. Extremely popular among professional 3D animators and motion graphics artists, it has been used for film and television in Doctor Strange, Spectre, Captain America: Civil War, and Game of Thrones. It had also found use in many other fields such as graphic design, science, engineering, and architectural visualization.
Cinema 4D R18 can integrate with a wide variety of other commercial products including Adobe Photoshop, Adobe After Effects, and Final Cut Pro. It can be used for modeling and comes with a complete set of spline primitives and spline drawing tools, which means that you do not need to switch to an external tool. In this version, many improvements been added to make 3D modeling much easier and offer better performance and usability.
While there are a lot of new features in this release of Cinema 4D, let me delve into some of the ones that really make this a good release for me. I will break them out by area.
New in MoGraph
• One of the biggest features is the new Voronoi Fracture, which gives you the ability to systematically fracture any object into procedural fragments. You can control the distribution of shattered pieces, and since it is a MoGraph object, it works with Dynamics and all of the effectors and falloffs within Cinema 4D. This is especially effective using a secondary object to cause the fracture, such as one object rolling toward another causing the stationary object to fracture upon collision.
Select Voronoi Fracture off of the MoGraph menu and add an object to it. From there you have a lot of control on the fracture itself. It is helpful to colorize the fragments to see the layout.

On the Sources tab you can tell the object just how to fragment. By default, you can set Point Generator and Distribution. Increasing the number of points will increase the number of fragments. You can also change the distribution from normal, where there are more fragments inside than outside, to one of the other types such as inverse normal with smaller pieces on the outside. Exponential lets you move from smaller on one side of an object to larger on another so you can have smaller pieces near the collision site and moving away.
You can also add a shader source to control the fracture with things like noise or gradients. Here you can control where the break takes place – for example, if you want your object to break down the middle. You can even stack the sources to be affected by multiple sources. There is enormous potential for the Voronoi Fracture, and for me, it is one of the must-haves of this release.
• With the MoGraph Weight Map Paintbrush you can paint weights to certain objects and then use a random effector to create an effects falloff around your painted areas, giving you controlled mapping of your system. You can even have multiple weight maps for more control, such as having one part of the object behave one way and another part totally differently.
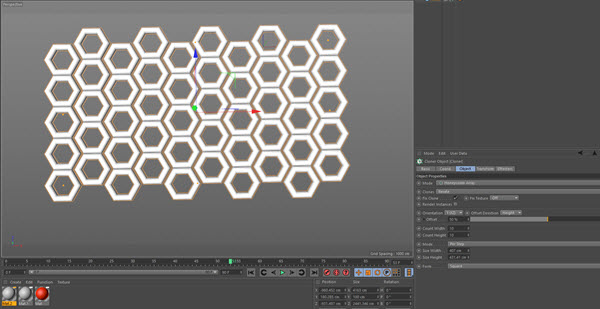
• The new Honeycomb Array Mode inside the cloner lets you create new arrangements of objects quickly and easily without having to use much memory. You set up the object you want to clone and you can specify the size widths and spacing widths and the number of rows and columns. The mode handles the mathematics. This is great when you want to create a large array of items, such as bricks, without much effort.
• Swap Cloner/Matrix lets you move between Matrix and Cloner modes, giving you more flexibility when running complex models – switch back to the less demanding Matrix mode, then when you are done go back to the cloner.
New in Modeling
• Knife Tools are noticeably different in this release. Now when you press ‘K’ for the knife tool a popup displays three options: ‘J’ for plane cut, ‘K’ for line cut, and ‘L’ for loop/path cut. Simply press the letter for the type you want. What is cool is that the new Line Cut tool lets you cut across one to many items, and you can refine the cut using an interactive preview tool. You can remove parts, split things based on cuts, and lock in on edges. The new Plane Cut tool gives you the ability to create new edges using the Local, World, or Camera axis. The Loop/Path Cut tool creates paths based on distances to surrounding edges and will hold the curves when creating new edges.
• Baking Displacement now has a new ray cast algorithm for baking sculpted elements in the Red/Green, Intensity, and Intensity Centered methods. Here you have options to set the Max Ray Cast distance to determine how far rays are cast, up to infinity. An Auto Spike Filter Threshold will limit the spikes that appear in the displacement map. If you use the default settings, it will choose options that will work well in most cases. In any case, the final results are much better than in Release 17.
• Set UVW from Projection makes it easier to generate an initial set of UV coordinates on an object or group of objects without having to add materials to each of them first. There are two new projection types, Cubic 2 and Box, that help you quickly create or unwrap an object to make changes to the wrap, even to multiple objects.

New in Animation
• Object Tracker lets you integrate objects in Cinema 4D into real-world footage quickly and easily. With this feature, you can reconstruct the motion of the camera using the motion tracker and integrate it with your object animation. To begin, you set the frame rate to the frame rate of the video you will be importing along with the render settings of your animation. Then you go to the motion tracker and import the footage. Keep in mind that you need to have easily identifiable points in your footage that you can track. For this, having a solid background with points of a contrasting color will work.
For each point you want to track you add a user track. Once you get enough tracks marked, you need to solve the object motion. To do this you need to add the object tracker and assign tracks to the object. You then run 3D Solver for the object. You will need to set the scale for the object to match the motion. You can then bring in the object you would like to add to your footage and attach it to the object tracker. You create a null object and add it to the object tracker, paste the object into the scene and drag it to the object null, and adjust the object to where you want it to be in relation to the scene. You can then scrub through the scene to adjust it within the frames.
• Parent Constraint is useful when an object needs to change its parent during animation. To do this, you can add multiple targets to a scene and assign the targets to objects in the scene. You can then change the parent object throughout the scene.
• A new Quaternions workflow gives you the ability to handle gimbal lock difficulties. This is useful when you are running into problems with your rotation interpolation. Simply enabling the Quaternion rotation checkbox removes the gimbal lock and makes sure that the rotation key-frames will be linked and interpolated in a linear or cubic manner. The downside is that Quaternion rotations don’t work well with rotations greater than 180 degrees, because Quaternions are always looking for the shortest path between two keys and thus will not behave as expected.
• Shift Priority is a new tag that will help get priorities straight without negatively impacting your rig. You just add the tag to a group of objects to shift all of the objects and change their priorities. You can use this tag with XRef objects to shift their priorities without affecting the original file.
New in Rendering
• Thin Film Shader lets you simulate oil and other refractive surfaces that coat everyday objects. This can be added to an existing material to give it a shiny, slick look, or you can use it as is to give a thin film look. The idea is that there are wavelengths of light that pass through materials and certain thicknesses absorb frequencies that provide certain looks. The indexes of refraction (IOR) produce looks of various materials, like beer, milk, glass, or oil. By changing the variables within the materials editor, you have a lot of control over the look and feel of your object.
• Inverse Ambient Occlusion lets you invert the direction of ambient occlusion (AO) to create different render effects, all done through one checkbox. By manipulating various controls you can create the impression of sub-surface scattering effects as well as create worn edges on certain materials.
• Shadow Catcher material has been added to this latest release. It allows you to create an alpha channel based off the shadows cast by lights in a scene. Thus you can composite objects without white fringing because of anti-aliasing in the object buffers or having to render out two separate takes for the object and the surface it is casting a shadow upon.
• The Parallax attribute is located inside the Bump channel in Cinema 4D R18. It will help you to enhance the effects of a materials bump. It provides more depth to your renders without waiting for displacement. In essence, it gives more feeling to your renders without a lot of work to the render.
New in Workflow

• Viewport Enhancements provide better viewport quality through the enhanced OpenGL viewport, giving you a better look directly onscreen without having to render. The Screen Space AO adds to the look in the viewport, and reflections add more depth to the view using HDR.
• Substance Engine Integration is now a part of Cinema 4D. Substances are procedural materials that offer incredible flexibility. When you change a Substance’s parameter, it updates the textures immediately. To load a Substance, just select Load Substance from the Pipeline menu. Choose a Substance Archive and open. The Substance will be available in the Substance Asset Manager. A material with a Substance linked to it will always be created automatically. Pre-made Substances can be found and purchased at Allegorithmic’s website, and Substances can also be created with Substance Designer also from Allegorithmic.
Cinema 4D R18 is a significant release. It comes with a lot of great new features that make it a must-have upgrade. The Voronoi Fracture leads the group, providing a lot of functionality that would have been difficult to replicate without it. The New Honeycomb Array makes it easy to replicate a large number of items quickly and easily. The Knife tool provides a lot more flexibility, the Thin Film Shader opens a whole new world of possibilities to your renders, and the Object Tracker adds more control to animating your objects.
Add in the other enhanced tools, workflow improvements, viewport enhancements, and all I described above, there are really a lot of improvements to this release. If you are wondering about upgrading from a prior release, I would say this is the one to upgrade to. If you are considering investing in Cinema 4D, now is a really great time to come on board. I highly recommend this Maxon product.